1
/
of
4
Leather Repair Kit for Sofas, Car Seats, Gear Gaiters, Interiors, Upholstery, Vinyl
Leather Repair Kit for Sofas, Car Seats, Gear Gaiters, Interiors, Upholstery, Vinyl
Regular price
€7,78 EUR
Regular price
€12,78 EUR
Sale price
€7,78 EUR
Taxes included.
Shipping calculated at checkout.
Small tear on the seat??
From today, you no longer need an upholsterer, thanks to this DIY seat repair kit. You can repair and color the damaged part (using the provided colors) and make it as similar as possible to your color!
Features and technical specifications:
Suitable for leather, artificial leather, and vinyl
Quick repair in case of damage
Important: Read the instructions for use carefully and perform a first test repair on the provided piece of vinyl before attempting the desired repair.
1. CLEAN - Clean the damaged area thoroughly with a normal detergent (possibly also with alcohol). Remove all dirt and ensure that the damaged area, after cleaning, is clean, grease-free, and dry before proceeding with the repair. If necessary, smooth rough edges with a razor blade.
2. FILLING LARGER DAMAGES – For larger tears, cut a sufficient amount of the provided cotton piece (other types of fabric can also be used) and fit it into the damaged area. In case of larger breaks or cuts, cut a piece slightly larger than the damage and apply it, using the spatula, from above (through the cut or break) under the damaged area. For small cuts or abrasions, there is no need to fill the damaged area or place a piece of cotton underneath.
3. FILLING WITH ADHESIVE – Use the provided adhesive glue; apply it using the plastic spatula. Fill the damage and level it. Caution: absolutely avoid excess material. As the adhesive shrinks, it creates the necessary space to fill and then structure with liquid leather. In the case of cuts, only fix the fabric placed underneath with the adhesive. The adhesive requires four hours to dry before you can proceed.
4. COLOR MIXING OF THE REPAIR COMPOUND – The color mixing chart helps you find and mix the most suitable shade. Thanks to the repair material in basic colors, you are able to mix all current shades. Pay attention that the more accurately the color mixture is synchronized with the base material to be repaired, the better the results will be. If you are unable to mix a very difficult shade, contact a specialized store, where they will certainly be able to help you. Initially, always start mixing a small amount until you obtain the desired shade. Only then mix a sufficient amount to carry out the repair.
5. APPLY THE REPAIR MATERIAL – Use the provided spatulas (or similar suitable object) to apply the color-matched repair compound evenly and thinly onto the damaged area. Do not apply too much repair compound and remove excess material (caution: avoid overfilling). To ensure a good quality repair, apply the compound well-leveled and smooth.
6. USE OF TEXTURED PAPER - Choose the textured paper that most closely resembles the surface structure of the item to be repaired and mark the upper side with an X. Place the X exactly on the colored repair compound and press carefully. Be careful to place the correct side of the textured paper (upper side = this side up) SO DO NOT MOVE OR REMOVE THE TEXTURED PAPER!
7. USE OF THE THERMAL PEN - Set your iron to the highest temperature and wait 5 minutes until it has heated up. Now hold the metal plate of the thermal pen for about 3 to 4 minutes against the hot iron. Move the hot ball, in slow circles, for about 35 - 45 seconds over the repair spot marked with an X. This dries the colored repair compound. Be careful never to touch unprotected areas with the hot ball, as they would immediately be damaged. Allow the repair compound to cool completely before removing the textured paper. If there are still holes at the damaged area, repeat the procedure. More operations in thin layers and less colored putty favor a better result. Larger damages can be heated directly with the tip of the iron. Proceed as described above, but be careful to keep the tip of the iron only on the damaged area. Work precisely and diligently and do not touch protected areas. Allow the colored repair compound to cool before removing the textured paper. Important: do not move the textured paper during heating. This operation can be repeated whenever and as many times as you wish; you can also retouch an already completed repair: The textured paper and spatulas are reusable. Clean after use. If the result is too shiny, simply treat the area with steel wool (available in all household goods stores) to achieve the desired result. If, on the other hand, it is not shiny enough, treat with vinyl-based wax (Vinyl floor Wax).
WARNING: Keep out of reach of children!
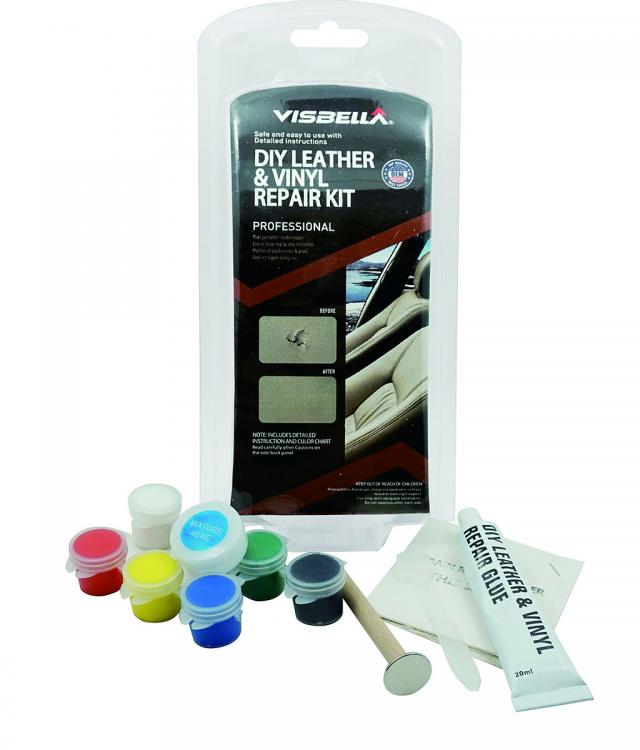
PACKAGE CONTENTS
1 bottle of glue 15 ml
7 colors
1 container for mixing colors
1 small spatula
1 pad
1 mix of leather vinyl patches etc. (1 pc x each type for a total of 5)
From today, you no longer need an upholsterer, thanks to this DIY seat repair kit. You can repair and color the damaged part (using the provided colors) and make it as similar as possible to your color!
Features and technical specifications:
Suitable for leather, artificial leather, and vinyl
Quick repair in case of damage
Important: Read the instructions for use carefully and perform a first test repair on the provided piece of vinyl before attempting the desired repair.
1. CLEAN - Clean the damaged area thoroughly with a normal detergent (possibly also with alcohol). Remove all dirt and ensure that the damaged area, after cleaning, is clean, grease-free, and dry before proceeding with the repair. If necessary, smooth rough edges with a razor blade.
2. FILLING LARGER DAMAGES – For larger tears, cut a sufficient amount of the provided cotton piece (other types of fabric can also be used) and fit it into the damaged area. In case of larger breaks or cuts, cut a piece slightly larger than the damage and apply it, using the spatula, from above (through the cut or break) under the damaged area. For small cuts or abrasions, there is no need to fill the damaged area or place a piece of cotton underneath.
3. FILLING WITH ADHESIVE – Use the provided adhesive glue; apply it using the plastic spatula. Fill the damage and level it. Caution: absolutely avoid excess material. As the adhesive shrinks, it creates the necessary space to fill and then structure with liquid leather. In the case of cuts, only fix the fabric placed underneath with the adhesive. The adhesive requires four hours to dry before you can proceed.
4. COLOR MIXING OF THE REPAIR COMPOUND – The color mixing chart helps you find and mix the most suitable shade. Thanks to the repair material in basic colors, you are able to mix all current shades. Pay attention that the more accurately the color mixture is synchronized with the base material to be repaired, the better the results will be. If you are unable to mix a very difficult shade, contact a specialized store, where they will certainly be able to help you. Initially, always start mixing a small amount until you obtain the desired shade. Only then mix a sufficient amount to carry out the repair.
5. APPLY THE REPAIR MATERIAL – Use the provided spatulas (or similar suitable object) to apply the color-matched repair compound evenly and thinly onto the damaged area. Do not apply too much repair compound and remove excess material (caution: avoid overfilling). To ensure a good quality repair, apply the compound well-leveled and smooth.
6. USE OF TEXTURED PAPER - Choose the textured paper that most closely resembles the surface structure of the item to be repaired and mark the upper side with an X. Place the X exactly on the colored repair compound and press carefully. Be careful to place the correct side of the textured paper (upper side = this side up) SO DO NOT MOVE OR REMOVE THE TEXTURED PAPER!
7. USE OF THE THERMAL PEN - Set your iron to the highest temperature and wait 5 minutes until it has heated up. Now hold the metal plate of the thermal pen for about 3 to 4 minutes against the hot iron. Move the hot ball, in slow circles, for about 35 - 45 seconds over the repair spot marked with an X. This dries the colored repair compound. Be careful never to touch unprotected areas with the hot ball, as they would immediately be damaged. Allow the repair compound to cool completely before removing the textured paper. If there are still holes at the damaged area, repeat the procedure. More operations in thin layers and less colored putty favor a better result. Larger damages can be heated directly with the tip of the iron. Proceed as described above, but be careful to keep the tip of the iron only on the damaged area. Work precisely and diligently and do not touch protected areas. Allow the colored repair compound to cool before removing the textured paper. Important: do not move the textured paper during heating. This operation can be repeated whenever and as many times as you wish; you can also retouch an already completed repair: The textured paper and spatulas are reusable. Clean after use. If the result is too shiny, simply treat the area with steel wool (available in all household goods stores) to achieve the desired result. If, on the other hand, it is not shiny enough, treat with vinyl-based wax (Vinyl floor Wax).
WARNING: Keep out of reach of children!
PACKAGE CONTENTS
1 bottle of glue 15 ml
7 colors
1 container for mixing colors
1 small spatula
1 pad
1 mix of leather vinyl patches etc. (1 pc x each type for a total of 5)
Share